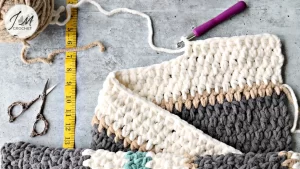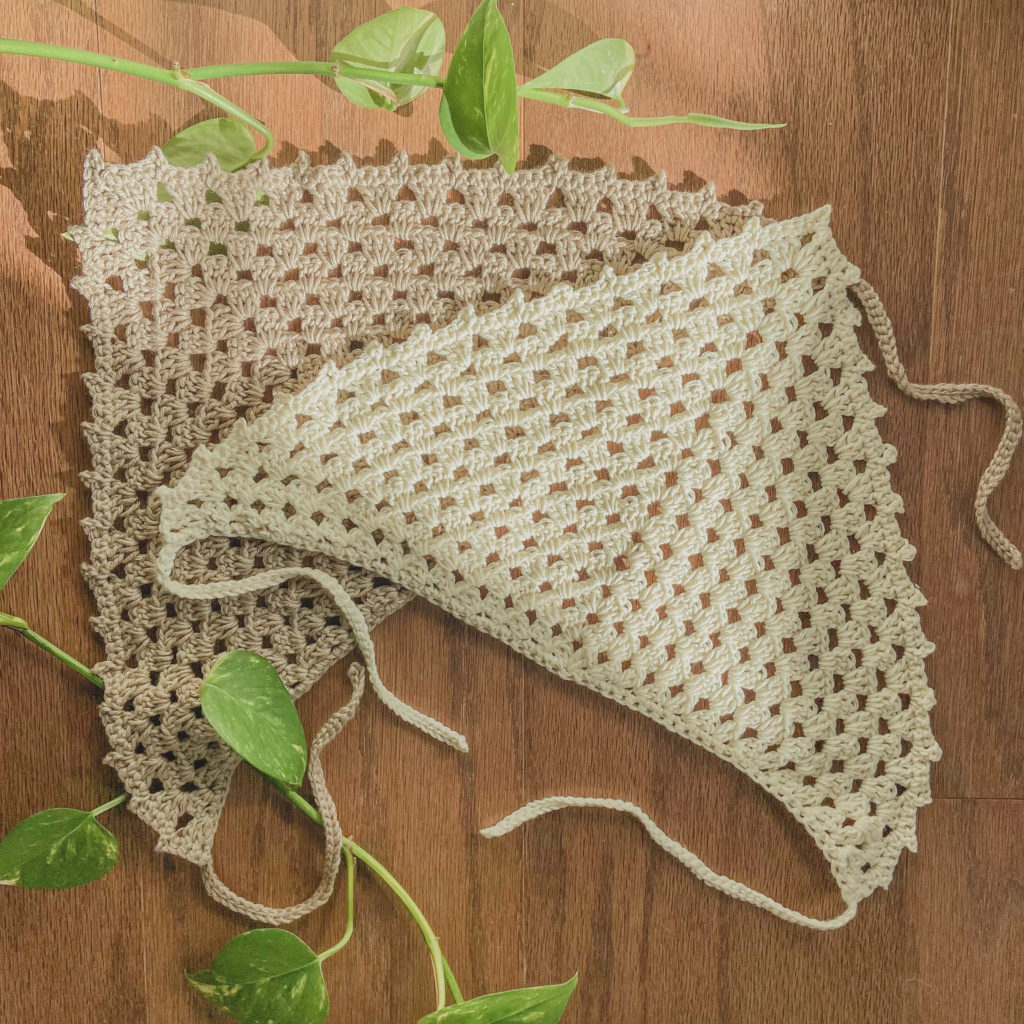
The humble bandana is a timeless accessory, offering both practicality and a touch of flair. Whether you’re keeping your hair out of your face on a hot day or adding a pop of color to your outfit, a crocheted bandana is a versatile and easy project to make. This guide is perfect for beginners who want to learn some fundamental crochet techniques while creating a stylish piece.
Materials You’ll Need:
- Worsted weight yarn in your desired color(s)
- Crochet hook in a size appropriate for your yarn (check the yarn label for recommendations)
- Tapestry needle (optional, for weaving in ends)
- Scissors

Choosing Your Yarn and Hook:
Worsted weight yarn is a good all-around choice for crocheting bandanas. It’s not too thick or too thin, making it easy to work with and creating a comfortable wear. Consider using acrylic yarn for its affordability and ease of care, or cotton yarn for a more natural feel.
The size of your crochet hook will depend on the weight of your yarn. The yarn label will typically suggest a hook size range that will achieve the proper gauge (the number of stitches per inch). It’s always a good idea to make a small gauge swatch to ensure your stitches are the right size before starting the bandana.

Learning Basic Stitches:
There are just a few basic crochet stitches you’ll need to know to create a bandana. Here’s a quick rundown:
- Chain (ch): This is the foundation stitch used to start most projects. To chain, simply hold the yarn tail in your non-dominant hand and loop the yarn over your crochet hook. Pull the loop through the first loop on your hook to create a chain stitch. Repeat this process to create a chain of the desired length.
- Single crochet (sc): Insert your hook under both loops of the next chain or stitch, yarn over, pull through to create two loops on your hook, yarn over again, and pull through both loops on your hook. This completes one single crochet stitch.

Crocheting the Bandana:
There are two main ways to crochet a bandana: a triangle shape or a rectangle with shaping. We’ll explore both methods:
Method 1: Triangle Bandana
- Start with a chain. The number of chains you make will determine the width of the finished bandana. A good starting point for beginners is 40 chains.
- Single crochet across the chain. Once you have your starting chain, turn your work and single crochet into the second chain from your hook (we typically don’t crochet into the first chain). Single crochet into each chain across the row.
- Turning chain and increasing. At the end of the row, chain 3 (this turning chain counts as your first single crochet in the next row). Now, we’ll create some increases to shape the triangle. Single crochet two stitches into the first stitch of the previous row. Skip the next stitch, then single crochet three stitches into the top of the turning chain from the row below.
- Repeat and shape. Continue crocheting rows, always starting with a turning chain and two single crochets in the first stitch. Skip a stitch before crocheting three single crochets into the top of the turning chain from the previous row. This will create a diagonal line that widens the triangle.
- Decrease and finish. When your triangle reaches the desired length (typically the point where it comfortably covers your head), it’s time to decrease. Instead of crocheting three stitches into the turning chain space, crochet two single crochets together (single crochet two stitches into the same space). Continue decreasing across the row, working two single crochets together until you have a few stitches remaining. Single crochet these stitches together to close the triangle.
Method 2: Rectangle Bandana with Shaping
- Make a chain. Similar to the triangle method, the number of chains will determine the width of your bandana. Here, you can chain a bit more generously, perhaps 50-60 chains, depending on your preference.
- Single crochet across. Single crochet into each chain across the row, turning your work at the end.
- Continue crocheting rows. Simply single crochet across each row, turning your work at the end. The length you crochet here will determine the depth of the bandana when folded in half diagonally.
- Shaping the tie. Once you’ve reached your desired depth, it’s time to shape the tie portion of the bandana. Here, you can experiment with different techniques. One option is to decrease at the beginning and end of each row. To do this, single crochet two stitches together at the beginning of the row, then single crochet across the rest of the row. At the end of the row, after crocheting across, single crochet the last two stitches together. Continue crocheting rows in this manner, decreasing one stitch at each end, until you have a manageable number of stitches remaining (around 10-12). Single crochet these stitches together to close the tie end.

Finishing Touches:
Once you’ve completed crocheting the bandana, weave in any loose ends using a tapestry needle. This will prevent them from unraveling. You can also add a decorative touch by crocheting a single row of contrasting color around the edge of the bandana for a pop of flair.

Customizing Your Bandana:
The beauty of crocheting your own bandana is the endless possibilities for customization. Here are some ideas to inspire you:
- Color play: Use a single color for a classic look, or experiment with stripes, color blocks, or even a gradient yarn.
- Stitch variations: Once you’re comfortable with single crochet, try incorporating other basic stitches like double crochet or half double crochet for a different texture.
- Embellishments: Add a crocheted flower, fringe, or buttons for a unique touch.
Tips for Beginners:
- Don’t be afraid to practice. Crocheting takes some practice to get the hang of it. Make a few swatch squares to get comfortable with your tension and chosen stitch before starting the bandana.
- Use stitch markers. These handy little tools can help you keep track of your place, especially when working rows with increases or decreases.
- Check your work regularly. Take a moment every few rows to look over your stitches and ensure you’re on track. It’s easier to fix a small mistake early on than to unravel a whole section later.
- Most importantly, have fun! Crocheting is a relaxing and rewarding hobby. Enjoy the process of creating something beautiful and unique.
With a little practice and this guide, you’ll be crocheting stylish bandanas in no time. So grab your yarn and hook, and get ready to add a touch of handmade flair to your wardrobe!